Desk Organization: Cable Management and Supplies Guide
A cluttered desk doesn’t just look bad. It actively makes you less productive. Research from Princeton University found that visual clutter reduces your ability to focus and process information. Your brain treats every item on your desk as a potential task competing for attention.
I noticed this firsthand when I started working from home. If clutter is a problem beyond just your desk, our room-by-room decluttering checklist covers every area of your home. The messier my desk got, the harder it was to concentrate. The fix isn’t complicated, though. A well-organized desk takes about an hour to set up and two minutes a day to maintain. Here’s how I did it.
A separate study by the National Association of Professional Organizers found that the average person wastes 4.3 hours per week searching for papers. That adds up to more than 200 hours per year, which is nearly five full work weeks spent looking for things that should have a home. An organized desk eliminates most of that wasted time.
Does a Clean Desk Actually Improve Productivity?
Yes. A clean desk reduces visual distractions that compete for your brain’s attention, which directly improves focus and task completion. Research from the Princeton Neuroscience Institute confirmed that multiple visual stimuli in your field of view suppress your ability to process information. In practical terms, a clear desk surface means your brain can dedicate more resources to the task at hand rather than filtering out clutter. Most people who switch to a clean desk system report feeling less mentally fatigued at the end of the workday.
The Clean Desk Rule
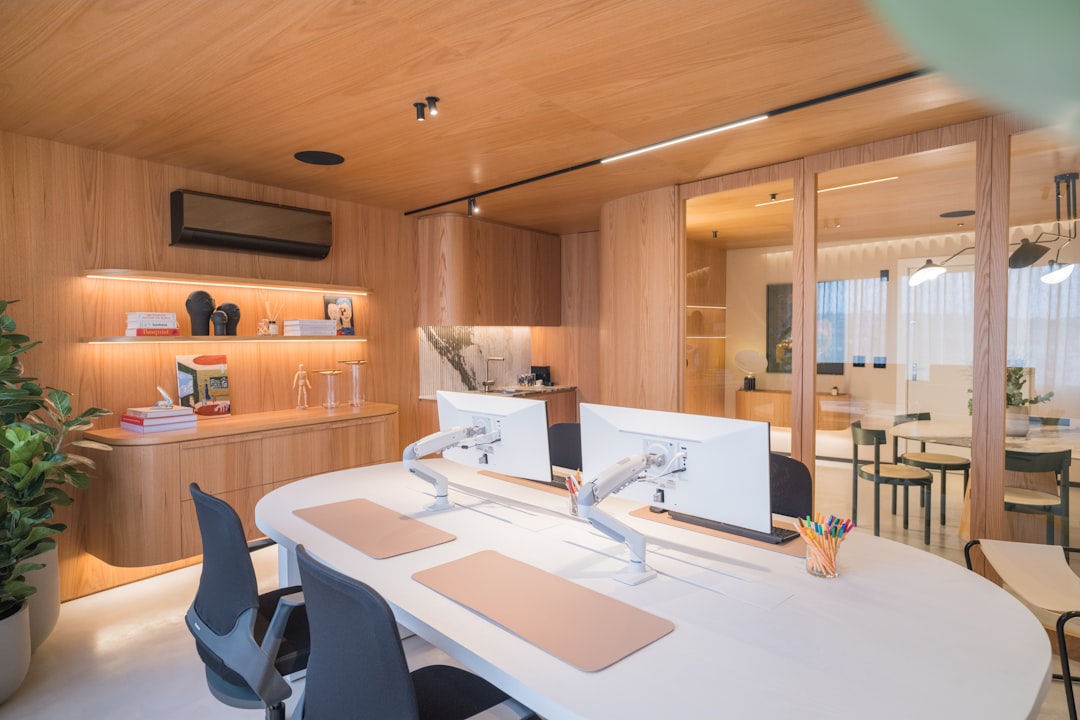
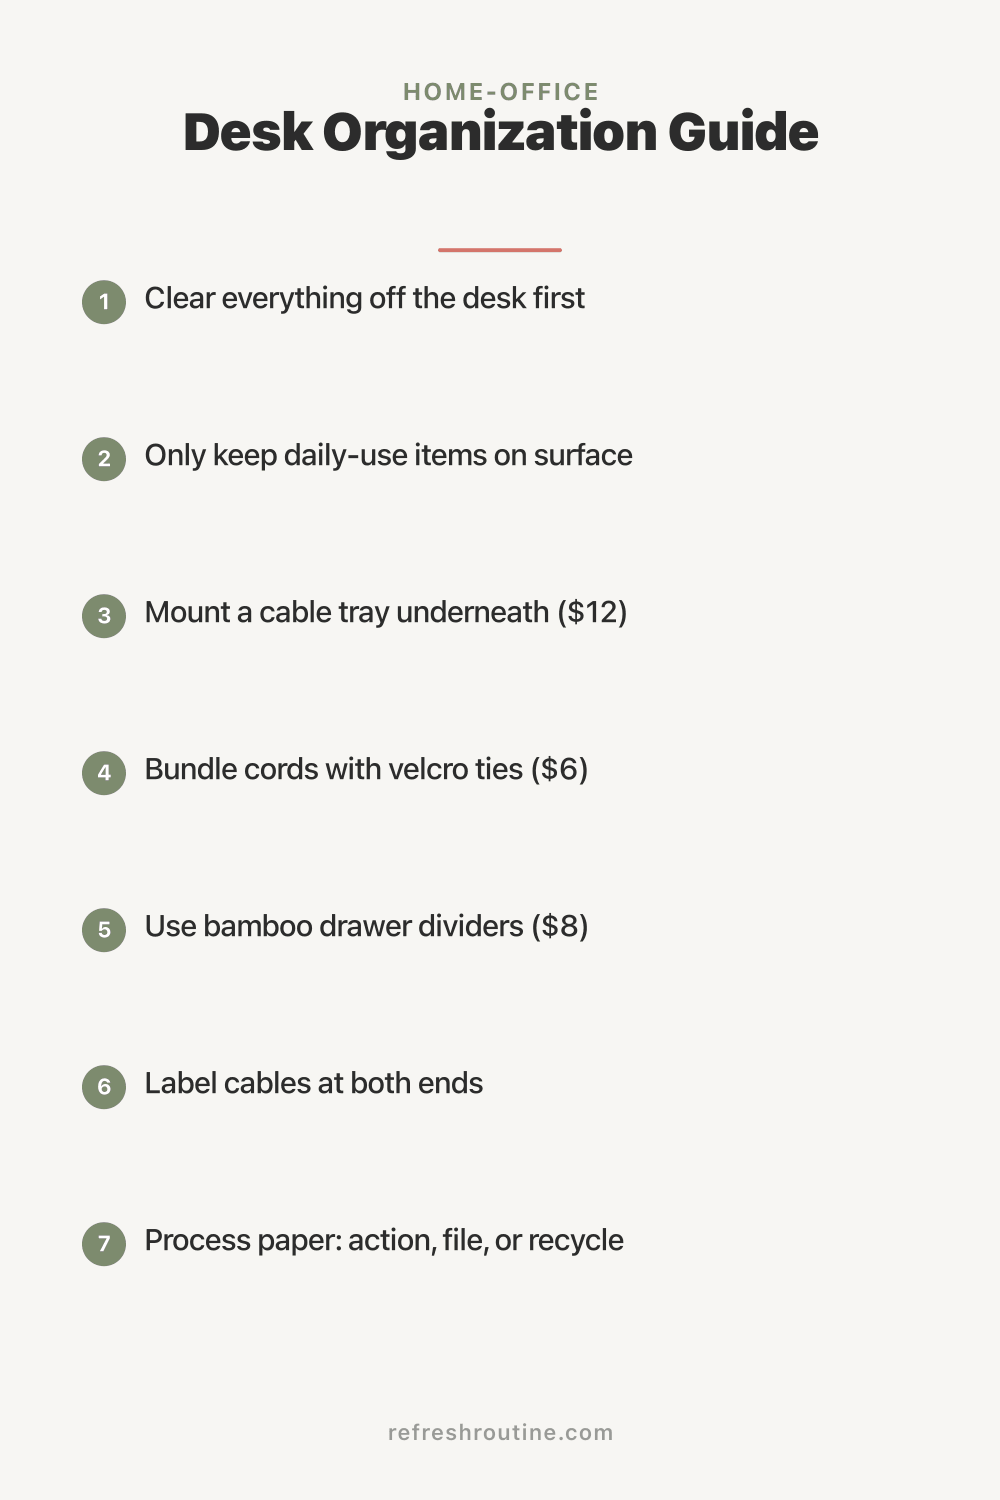
Before organizing anything, clear your entire desk. Take everything off. Monitors, keyboard, plants, that pile of sticky notes, everything. Wipe down the surface.
Now, only put back items you use every single day:
- Monitor (or laptop)
- Keyboard and mouse
- One pen and one notepad
- Phone charger
- That’s probably it
Everything else lives in a drawer, on a shelf, or in a desktop organizer. The goal is maximum open surface area. More empty space equals more mental clarity. I was skeptical at first, but it genuinely made a difference.
When I first did this exercise, I removed 23 items from my desk. Twenty-three. There were three half-empty coffee mugs, a stack of mail I had been ignoring for two weeks, four pens (three of which were dead), a pile of sticky notes with information I had already acted on, and an assortment of random items that had just accumulated over time. Seeing all of that off my desk for the first time was honestly shocking. The desk felt twice as large.
Cable Management (The Game Changer)
Nothing makes a desk look messier than tangled cables. Here’s a three-step cable management system that worked wonders for me:
Step 1: Under-Desk Cable Tray
Mount a cable management tray underneath your desk ($12-18). This holds your power strip and all the excess cable length, completely hiding them from view. Most trays screw into the underside of the desk. If you’re renting, adhesive-mount trays work too.
I specifically chose a mesh cable tray because it allows airflow around the power strip, which prevents heat buildup. It is wide enough to hold the power strip, a laptop charger brick, and coiled excess cable length from four devices. Once everything was tucked up into the tray, the floor under my desk went from a tangled mess to completely clear. I can actually vacuum under there now, which I never could before.
Step 2: Cable Ties
Bundle cables that run together with reusable velcro cable ties ($6 for a pack). Group them logically: power cables together, USB cables together, audio cables together.
Step 3: Cable Clips
Adhesive cable clips ($5 for a pack) route individual cables along the back edge of your desk. This prevents the “cable jungle” where every cord takes its own random path.
Total cable management cost: under $25. It takes 30 minutes to set up and permanently eliminates desk cable mess. This was probably the best $25 I’ve ever spent on my home office.
Here is one more cable tip that saves frustration: label your cables at both ends with small pieces of masking tape. Write what each cable connects to (monitor, phone charger, speaker, etc.). When you need to unplug something, you know exactly which cable to pull without tracing it through the tangle. This takes two minutes to set up and eliminates the guessing game.
Desk Drawer Organization
If your desk has drawers, use dividers to create dedicated zones:
Top drawer (daily access):
- Pens and pencils (only the ones that work)
- Sticky notes
- Paper clips and binder clips
- USB drives
- Headphones
Bottom drawer (weekly access):
- Notebooks and notepads
- Envelopes and stamps
- Extra supplies (refills, batteries)
- Files you’re actively working on
Drawer dividers ($8-12 for expandable bamboo dividers) prevent the inevitable “everything ends up in one pile” problem. I resisted buying these for way too long.
I apply the same frequency principle to drawers that I use for my pantry zones. The items I reach for multiple times a day go in the top drawer. Things I need once a week go in the bottom drawer. Anything I use less than monthly does not belong in my desk at all. It goes on a shelf or in a filing cabinet. This layered approach means my most-used supplies are always within arm’s reach and I never have to dig through rarely-used items to find them.
Desktop Organizer Setup
If you need supplies within arm’s reach but don’t have desk drawers, a small desktop organizer keeps things contained. Choose one that fits your actual needs:
- Minimal setup: A single pen cup and a small tray for incoming papers
- Standard setup: A pen cup, a letter tray (2-tier for inbox/outbox), and a small box for supplies What to avoid: Multiple organizers covering half your desk. That defeats the purpose entirely.
I use the two-tier letter tray system, and here is specifically how it works. The top tier is my inbox where anything that needs my attention goes: mail, printed documents, forms to sign, notes from my kids’ school. The bottom tier is my outbox for items that need to leave my desk, like finished paperwork to file, letters to mail, or documents to scan. Once a day during my end-of-day reset, I process both trays. The inbox gets handled or filed, and the outbox gets delivered to its destination. Nothing sits in either tray for more than 24 hours.
The Paper Management System
Paper is the number one source of desk clutter for most people, including me. Here is the specific system I use to keep paper under control.
Incoming paper gets sorted immediately into three categories: action (needs a response), reference (might need later), or recycle (junk). Action items go in the inbox tray. Reference papers get scanned with my phone and filed digitally, then the physical copy goes into recycling. Junk mail goes straight into the recycling bin next to my desk.
I keep a small shredder next to my desk. Any paper with personal information on it goes through the shredder immediately rather than sitting in a “to shred” pile. The shredder cost $30 and holds about 6 gallons before needing to be emptied. Having it within arm’s reach means I actually use it instead of letting sensitive documents pile up.
Go digital wherever possible. I scan receipts, school forms, and important documents using my phone and save them in organized folders. This eliminates the need for physical filing cabinets and means I can find any document in seconds with a search function. The switch to digital filing freed up an entire drawer in my desk.
The Daily Reset Habit
Organization isn’t a one-time event. Build a 2-minute end-of-day desk reset:
- Put all supplies back in their spots (30 seconds)
- File or recycle any loose papers (30 seconds)
- Close unnecessary browser tabs and apps (30 seconds)
- Quick wipe of the desk surface (30 seconds)
Do this before you shut down for the day. Tomorrow-you will start work in a clean, focused environment. I can’t overstate how much this small habit changed my mornings.
The psychological impact of starting your workday at a clean desk is significant. A study published in Psychological Science found that people in orderly environments made healthier and more generous choices than those in messy ones. Every morning, when I sit down to a clear desk with just my laptop, pen, and notepad, I feel focused and ready to work. On the rare mornings when I skipped the previous day’s reset, I notice the difference immediately. The mental drag of clutter is real.
Monitor and Screen Setup
While you’re organizing, optimize your screen setup for ergonomics:
- Monitor at arm’s length, top of screen at eye level
- Laptop users: consider a laptop stand ($20-30) to raise the screen to eye level
- If using dual monitors, place the primary one directly in front and the secondary at a slight angle
- Reduce screen glare by positioning away from windows or using a matte screen protector
A monitor arm ($25-40) is another investment I highly recommend. It clamps to the back of the desk and holds your monitor off the surface, freeing up the entire area underneath for a keyboard tray, notebooks, or extra workspace. It also makes it easy to adjust the height and angle, which reduces neck strain. I switched to a monitor arm about a year ago and it gave me back about two square feet of desk surface.
What About Personal Items?
A few personal items make your workspace feel like yours, but limit it to 2-3 things: a plant, a photo, a meaningful object. More than that crosses from “personalized” to “cluttered.”
Small desktop plants are great because studies show they reduce stress and improve productivity while taking up minimal space. If your desk is just part of a larger clutter problem, start with our full decluttering checklist. Succulents and pothos are nearly impossible to kill, which I appreciate as someone who has accidentally killed a cactus.
Home Office vs. Shared Space
If your desk is in a shared room (living room, bedroom), organization matters even more:
- Use a desk with storage (drawers or shelves) to contain everything when not working
- A desk cable tray is essential. Exposed cables in a living space look terrible
- End-of-day reset is non-negotiable. Your workspace needs to disappear into the room’s design
- Consider a desk mat ($15-20). It defines your workspace visually and protects the surface
For more home office organization ideas, explore our home office guide or check out small home office solutions for compact spaces.
What I Wish I Knew About Desk Organization
Looking back on my desk organization journey, here are the things that would have saved me time and money.
Start with cable management. I organized my desk surface first and left cables for “later.” The tangled cables underneath kept making the desk feel messy no matter how clean the top was. Do cables first. The visual payoff is enormous and it sets the foundation for everything else.
Keep your desk supplies minimal. You do not need 15 pens, a stapler, three highlighters, tape, scissors, and a calculator on or in your desk. I cut my supply collection in half and have never once missed anything I removed. Most of it was duplicates or things I used once a year.
A good chair matters more than a good desk. I spent months obsessing over desk organization and completely ignored the fact that I was sitting in a terrible chair for eight hours a day. Invest in an ergonomic chair before you invest in desk accessories. Your back will thank you.
The 2-minute reset is the entire system. All the organization in the world falls apart without daily maintenance. The cable tray, the drawer dividers, the letter trays. They all work only if you spend two minutes each evening putting things back. That daily reset is not optional. It is the engine that keeps the whole system running.
Key Takeaway
Desk organization comes down to three principles: minimize what lives on the surface, manage cables with an under-desk tray and clips, and maintain the system with a 2-minute daily reset. Start by clearing everything off your desk and only returning what you use daily. Tackle cable management next for the biggest visual improvement. Then set up drawer zones and a paper management system. The entire setup takes about an hour and costs under $50, and the daily reset ensures it stays organized permanently.
For more home office organization ideas, explore our home office guide or check out small home office solutions for compact spaces.

Frequently Asked Questions
What should I keep on my desk?
Only items you use daily: monitor, keyboard, mouse, a pen, a notepad, and your phone charger. Everything else should be in a drawer or shelf within arm's reach but off the desk surface.
How do I manage cables under my desk?
Use a cable tray mounted under the desk to hold power strips and excess cable length. Velcro cable ties bundle cables together, and cable clips route individual cables along the desk edge. Total cost: under $25.
How often should I organize my desk?
Do a 2-minute desk reset at the end of each workday — clear papers, put supplies away, wipe the surface. A deeper desk organization session once a month keeps drawers and storage from getting cluttered.