How to Organize Your Pantry Step by Step
An organized pantry honestly changes how you cook, shop, and eat. When you can see everything you have at a glance, you stop buying duplicates, waste less food, and actually use the ingredients you already own.
The good news? You don’t need a Pinterest-perfect walk-in pantry with matching containers for everything. If your kitchen is cluttered beyond just the pantry, start with our decluttering guide first. This guide works for any pantry, from a single cabinet to a full walk-in, and focuses on function over aesthetics.
I reorganized my own pantry about two years ago, and the difference in our grocery bill was immediate. We went from spending about $150 a week to closer to $120 because I stopped buying duplicates of things I already had. When you can actually see what you own, you shop smarter.
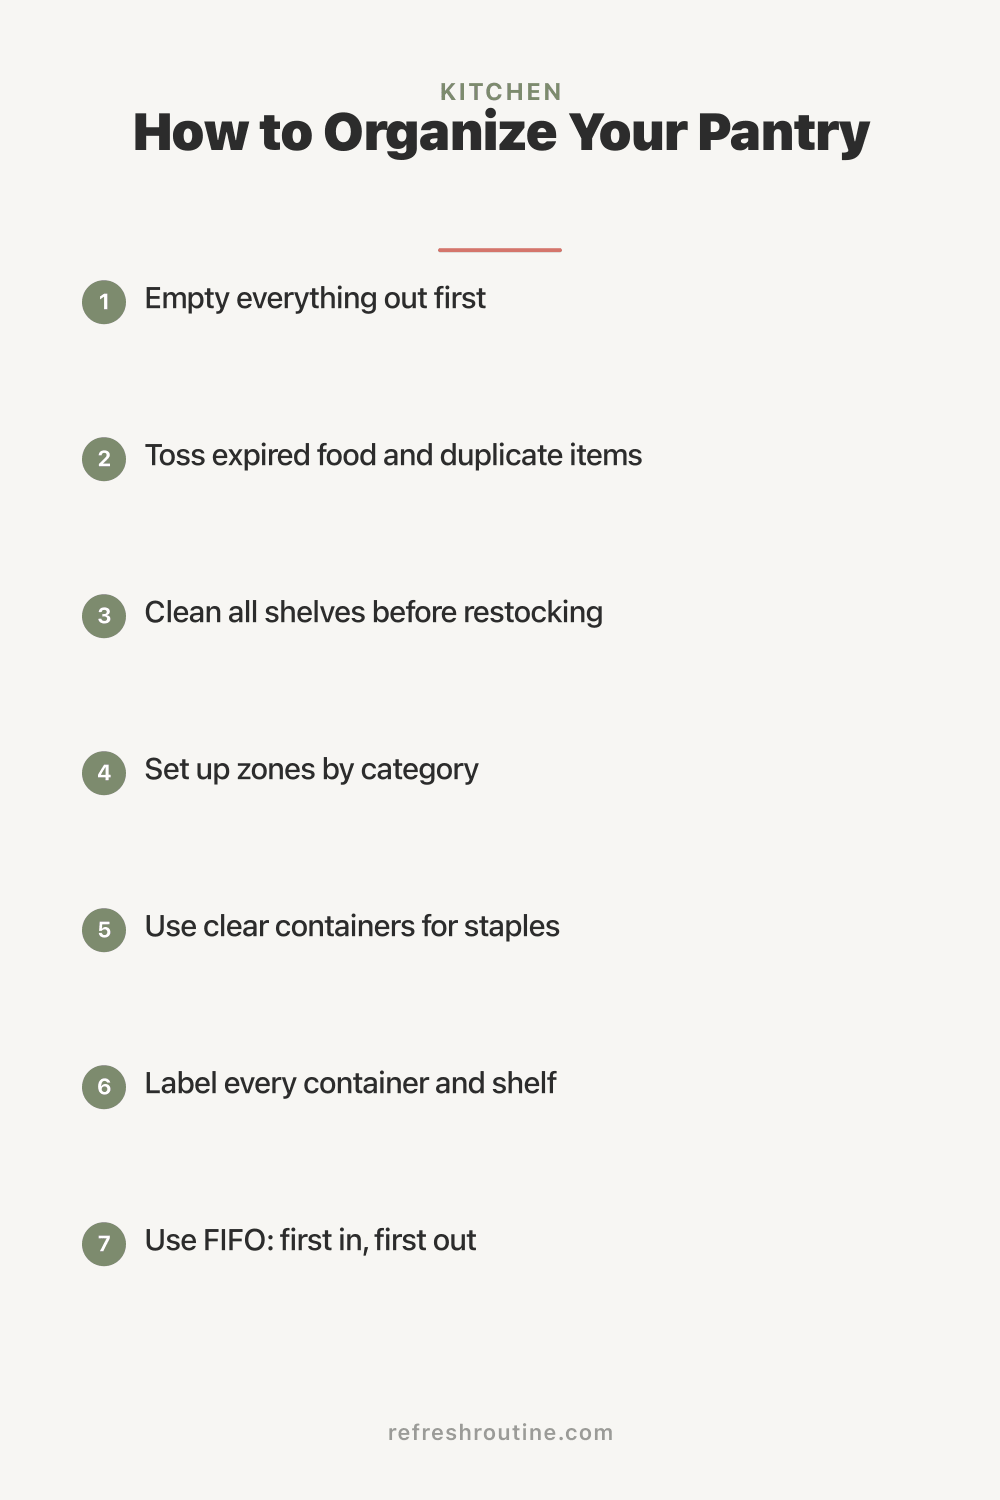
Step 1: Empty Everything
Yes, everything. Take every single item out of your pantry and put it on the counter or table. This is the only way to see what you’re actually working with.
As you empty, make three piles:
- Keep: Items you use regularly and are within their expiration date
- Toss: Expired items, stale chips, mystery packages with no labels
- Donate: Unopened items you won’t use but someone else can (check your local food bank)
You’ll be surprised how much expired or duplicate food you find. I was honestly embarrassed the first time I did this. According to the USDA, the average American family wastes $1,500 worth of food per year. An organized pantry with the FIFO method cuts this significantly. Most people discover they own three jars of cumin and seven half-used bags of pasta. I found four boxes of baking soda.
A study by the Natural Resources Defense Council found that up to 40% of food produced in the United States goes uneaten. A meaningful portion of that waste happens at home, in pantries and fridges where items get pushed to the back and forgotten. Organizing your pantry is one of the most direct ways to reduce your household’s food waste. The FDA’s food storage guidelines provide helpful reference points for how long different pantry staples remain safe to consume.
How Often Should You Clean Out Your Pantry?
Do a full pantry cleanout every six months, and a quick 5-minute check every week. The full cleanout involves emptying everything, wiping shelves, checking expiration dates, and reorganizing zones. The weekly check is much simpler: scan for expired items, note what is running low, and return anything that migrated to the wrong zone. This two-tier approach keeps your pantry functional year-round with minimal effort.
Step 2: Clean the Shelves
With everything out, wipe down every shelf, wall, and corner. If you have wire shelving, now’s the time to add shelf liners. They prevent small items from falling through and make future cleaning so much easier.
I use adhesive shelf liner on all my pantry shelves. It costs about $10 for a full roll and takes maybe 15 minutes to install. Beyond preventing items from slipping through wire shelves, it also catches crumbs and spills, which makes weekly maintenance as simple as wiping the liner with a damp cloth rather than scrubbing the shelf itself.
Step 3: Set Up Zones
This is the step that makes long-term organization actually stick. I found that grouping items by category and assigning each category a shelf or section was the real game changer.
Top shelves (hardest to reach):
- Bulk items and backstock
- Rarely used ingredients (specialty flours, holiday baking supplies)
- Extra paper goods
Eye-level shelves (prime real estate):
- Daily cooking essentials (oils, vinegar, sauces)
- Most-used spices
- Snacks
Lower shelves:
- Heavy items (canned goods, large bags of rice)
- Kids’ snacks (at their eye level)
- Baking supplies
Door or side area:
- Small packets (seasoning mixes, gravy packets)
- Condiments
- Wraps, foil, and bags
Here is a specific detail about the kids’ snack zone that made a big difference in my house. I put my children’s snacks on a low shelf in a clearly labeled bin. Now when they want a snack, they go to their bin and pick one themselves. This eliminated the constant “Mom, can I have a snack?” interruption cycle and taught them to make independent choices. I stock the bin once a week with pre-approved options, so I never have to worry about what they are grabbing.
Step 4: Containers and Storage
You don’t need to containerize everything. After trying a dozen approaches, here’s what I found actually makes a difference:
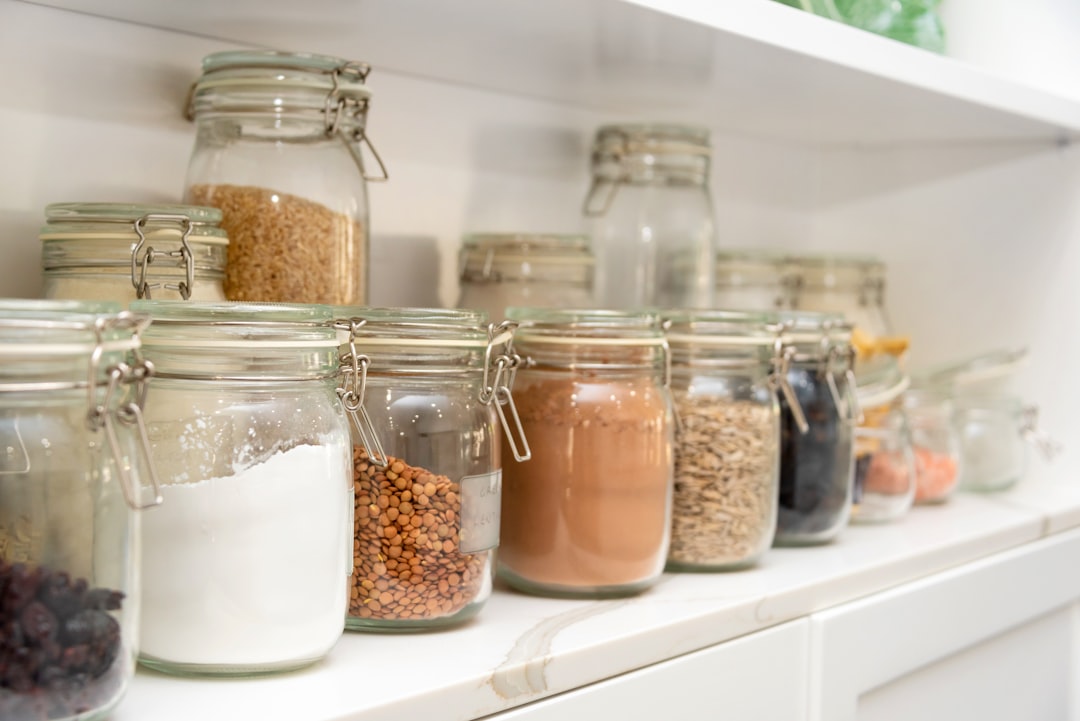
Worth putting in clear containers:
- Flour, sugar, rice, pasta (things that come in hard-to-reseal bags)
- Cereal and granola
- Snack items (crackers, pretzels)
- Baking supplies (baking soda, baking powder, chocolate chips)
Fine to keep in original packaging:
- Canned goods (just organize them in rows)
- Boxed items (stack neatly)
- Sealed spice jars
- Condiment bottles
Budget tip: Before buying matching containers, check what you already have. Mason jars, cleaned jam jars, and even plastic deli containers work perfectly. I used old pasta sauce jars for months before investing in anything else.
When I did eventually buy containers, I started with just six large ones for the staples I use most: flour, sugar, rice, oats, pasta, and cereal. That initial set cost about $30 and covered 80% of my needs. I added more gradually over the next few months as I identified what else would benefit from being containerized. Starting small prevents the common mistake of over-buying containers that sit empty on your shelves.
Step 5: Label Everything
Labels aren’t about being fancy. They’re about making sure everyone in the household knows where things go. When my husband asks “where does this go?” after grocery shopping, the label answers for him. It’s a small thing that saves so much frustration.
Simple label options:
- Masking tape + marker (free and effective)
- A label maker ($15-20, makes clean labels fast)
- Our printable pantry label set for a polished look
Label the containers and the shelves. Shelf labels prevent zone creep, so items stay in their assigned spots.
I label my shelves with a label maker, and I label my containers with both the item name and a line for the expiration date. For items I buy in bulk and transfer into containers, I write the expiration date from the original packaging directly on a small piece of masking tape and stick it on the container. That way I always know what needs to be used first, even after the original bag is recycled.
Step 6: Use the FIFO Method
FIFO stands for “first in, first out.” It’s the same system grocery stores use. When you buy new items, put them behind existing ones. This way, older items get used first and nothing expires in the back corner.
This single habit prevents most food waste. It takes five extra seconds when putting groceries away and saves you from throwing out forgotten cans of soup six months later. My favorite trick is to keep a small marker near the pantry so I can write the purchase date on anything that doesn’t have a clear expiration.
Here is how I specifically implement FIFO with canned goods, since they tend to be the biggest culprit for expiration. I organize cans in rows with the oldest cans at the front. When I add new cans, they go to the back of the row. I stand the labels facing outward so I can read the contents and the expiration date without picking anything up. This simple setup means I never reach for a can of tomatoes only to discover it expired eight months ago.
What Is the Best Way to Store Spices in a Pantry?
Store spices in a dedicated zone at eye level, either in a drawer with labels facing up or on a shelf using a tiered spice rack or lazy Susan. Keep them away from heat and direct light, which degrade flavor. Most ground spices lose potency after 6 to 12 months, and whole spices last about 2 to 3 years. Write the purchase date on each container and replace any spice you have had for more than a year. You will notice an immediate improvement in the flavor of your cooking.
Maintenance: The 5-Minute Weekly Check
Every week (pick a day, grocery shopping day works really well):
- Check for expired items (30 seconds)
- Move items that migrated to wrong zones back to their spots (1 minute)
- Wipe any spills or crumbs (1 minute)
- Note items running low on your shopping list (2 minutes)
That’s it. Five minutes a week keeps your pantry organized permanently. What worked for me was doing this check right before I write my grocery list.
I do my weekly check every Sunday morning while my coffee brews. It has become part of my routine. I glance at each zone, pull forward anything that got pushed back, and jot down items we need on a notepad I keep stuck to the pantry door. By the time my coffee is ready, the pantry is maintained and my grocery list is started. The whole thing takes less time than it takes for the coffee to drip through.
What I Wish I Knew About Pantry Organization
Here are the insights I gained from reorganizing my pantry three times before landing on a system that actually lasted.
Do not buy containers before you organize. I made this mistake on my first attempt and ended up with a pile of containers that did not fit my shelves. Organize first, measure your spaces, and then buy containers that actually fit.
Group by meal type, not just by category. In addition to my standard zones, I keep a small “quick dinner” section with pasta, jarred sauce, canned beans, and rice. On busy nights, I grab from that one spot and dinner is on the table in 20 minutes. No hunting through three different zones.
Vertical space is your friend. Shelf risers doubled my usable space in a single afternoon. I stack canned goods on risers so I can see the back row without moving the front row. A $12 set of two risers was one of the best small purchases I have ever made.
Keep a “use first” bin. I have a small basket at the front of my pantry labeled “use first.” When something is close to expiring or when I have an odd item leftover from a recipe, it goes in this bin. I check the bin before planning meals each week. It has nearly eliminated food waste in our house.
Pantry Organization on a Budget
You don’t need a $500 container haul from The Container Store. Here’s a budget-friendly approach that I love:
- Lazy Susans ($8-12): Perfect for oils, vinegars, and condiments in deep cabinets
- Shelf risers ($10-15): Double your vertical space for canned goods
- Clear bins ($5-8 each): Group small items (snack bars, tea bags, packet mixes)
- Door-mounted rack ($15-20): Adds storage for spices or wraps
Total cost for a full pantry organization: $40-60, and most of these items last for years.
Key Takeaway
An organized pantry is not about aesthetics or matching containers. It is about function. Empty everything, clean the shelves, set up zones by category, label both containers and shelves, and use the FIFO method to prevent food waste. The zone system is the single most important step because it makes putting groceries away intuitive and keeping the pantry organized almost effortless. Pair it with a 5-minute weekly check, and your pantry will stay functional for months between full reorganizations.
For our top product picks, check out the best kitchen organization products or explore more kitchen organization ideas. And once your pantry is dialed in, the natural next step is matching it with a refrigerator organization system so dry goods and cold storage work together.

Frequently Asked Questions
How long does it take to organize a pantry?
A full pantry organization takes 2-3 hours for a standard pantry. Budget an afternoon — you'll need time to empty everything, clean shelves, sort items, and put things back in zones.
Are clear containers worth it for pantry organization?
Yes — clear containers let you see exactly what you have and how much is left, which reduces food waste and duplicate purchases. Start with your most-used staples (flour, sugar, rice, pasta) and expand from there.
How do I keep my pantry organized long-term?
Use the FIFO method (first in, first out), do a 5-minute weekly check for expired items, and always put groceries away in their designated zones. The zone system makes maintenance almost automatic.