DIY Garage Pegboard Wall: Setup and Layout Ideas

After 3 years of tripping over the same tools every time I needed something in the garage, I finally installed a pegboard wall. The project took one Saturday, cost $85, and completely changed how I use the space. Every tool now has a home and I can see everything at a glance.
If you have been putting off your garage organization because it feels overwhelming, a pegboard wall is the highest-impact change you can make in a single weekend. Here is exactly how to do it.
Why Pegboard Beats Other Garage Storage Options
I tried plastic bins, metal shelves, and rolling tool chests before I committed to pegboard. Each had problems:
- Plastic bins hide tools so you forget what you have
- Metal shelves waste vertical space above eye level
- Tool chests work but cost 5 to 10 times more than pegboard
According to a study from the National Association of Home Builders, garage organization is one of the top home improvement projects with the highest satisfaction-to-cost ratio. Pegboard delivers exactly that.
The visibility is the killer feature. When tools hang on hooks, you grab the right one immediately. Compare that to digging through a toolbox for a Phillips screwdriver while the project waits.
What Is the Best Pegboard for a Garage?
The best pegboard for a garage is 1/4 inch tempered hardboard or steel pegboard. Tempered hardboard handles 5 to 15 pounds per hook and costs $25 per 4x8 sheet. Steel pegboard handles 50+ pounds per hook for heavy tools and costs $80 per panel. Choose based on what you store.
What You Need
Total budget: $75 to $150 depending on size and materials.
Materials:
- 1/4 inch tempered hardboard pegboard (4 feet by 8 feet sheet): $25
- 1x2 furring strips for spacers (8 of 8 foot length): $25
- 2 inch wood screws (1 box): $8
- 1/4 inch pegboard hook variety pack (50 pieces): $20
- Paint or polyurethane sealer: $15
Tools you need (likely already have):
- Drill with bits
- Stud finder
- Level
- Measuring tape
- Pencil
If you do not have a stud finder, buy one. They cost $15 and you will use it many times. The Consumer Product Safety Commission emphasizes proper anchoring for any wall-mounted storage to prevent tip-overs.
The 5-Step DIY Pegboard Installation
Step 1: Find and Mark Wall Studs
Use a stud finder to locate every stud in your installation wall. Mark them with a pencil from floor to ceiling. Studs are usually 16 inches apart on center. Your pegboard must mount into studs, not just drywall.
Step 2: Paint or Seal the Pegboard First
Paint or seal both sides of the pegboard before installation. This is way easier on the ground than after mounting. Use a roller for fast coverage. Two coats of latex paint or polyurethane works well.
I painted mine the same neutral gray as my garage walls. Some people use a bright color like yellow or red to make it a statement. Either works.
Step 3: Install Furring Strip Spacers
This is the step most people skip and regret. You need 1/2 inch of space between the pegboard and the wall so hooks can hook through the holes. Cut your 1x2 furring strips and screw them to the wall over every stud, going floor to ceiling.
The furring strips create the gap needed for hooks. Without this step, your hooks will not fit through the pegboard holes properly.
Step 4: Mount the Pegboard
Lift the pegboard against the furring strips. Use a level to make sure it is straight. Screw the pegboard into the furring strips every 16 inches. Use a washer with each screw to prevent the screw head from pulling through the pegboard.
This part is easier with two people. One holds the pegboard level while the other drills.
Step 5: Plan Your Layout Before Adding Hooks
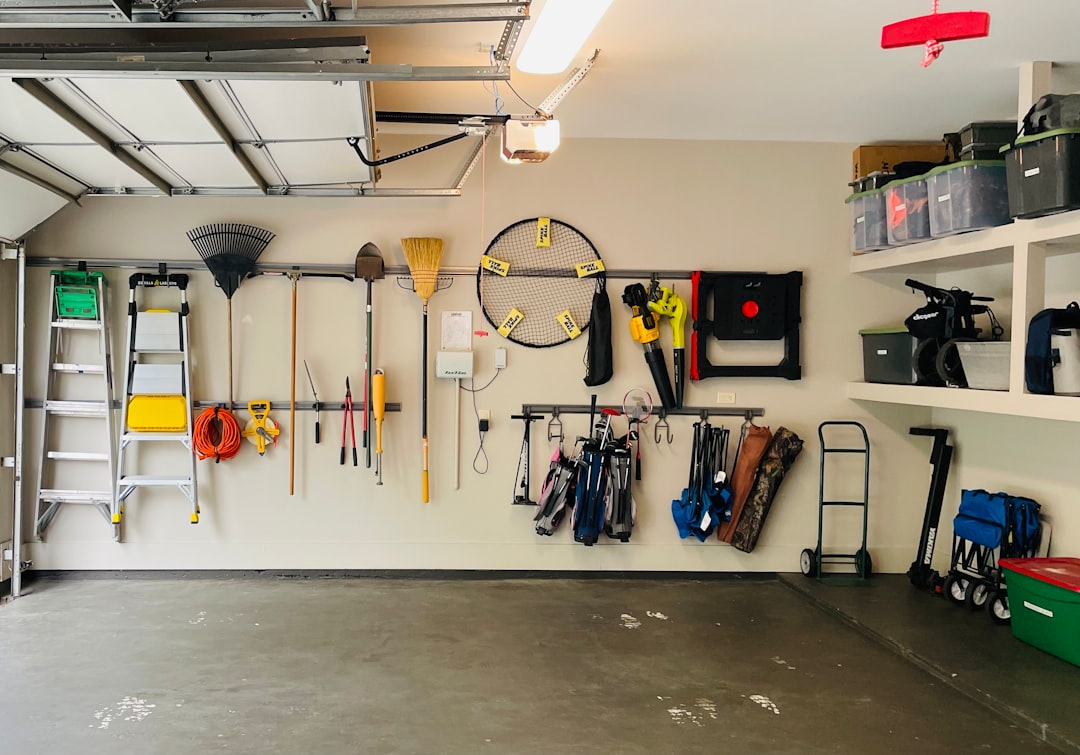
Resist the urge to immediately hang every tool. Plan first. Lay your tools on the garage floor and group them by category. Common groupings:
- Hand tools (hammers, screwdrivers, pliers)
- Power tool accessories
- Painting supplies
- Gardening hand tools
- Measuring tools
- Sports equipment
Once you have categories, sketch the layout on paper. Heavy items go low. Frequently used items go at chest height. Anything sharp goes higher to keep kids away.
Pegboard Layout Ideas That Work
After installing pegboards in 3 garages over the years, here are the layouts that work best.
The Zone Method: Divide your pegboard into 4 to 6 zones, each for a category of tools. Use painter’s tape outlines to mark where each tool belongs. When you put something back, you know exactly where it goes.
The Outline Trick: Trace each tool with a Sharpie on the pegboard. The silhouette shows where each item belongs. Borrow someone’s tool and the empty outline reminds you to get it back.
The Frequency Layout: Most-used tools at chest height. Less-used tools higher and lower. Stand at the pegboard and reach naturally to figure out your prime real estate.
For more zone-based organization ideas, check our garage zones guide.
How Do You Hang Heavy Tools on Pegboard?
For heavy tools, use heavy-duty steel pegboard rated for 50+ pounds per hook. Always mount the panel directly into wall studs, not just drywall. Use double-prong hooks that wrap around the pegboard hole twice for extra stability. Keep heavy items at chest height or lower so they do not pull the pegboard away from the wall.
What I Wish I Knew
Lessons from 3 pegboard installs.
Buy more hooks than you think you need. Variety packs at the hardware store have specific hook types for specific tools. I always need a few more after the initial install. Buy a 50-piece variety pack to start.
Use the holes for a tool reference. I drilled little pegboard sample holes into a piece of scrap to show me hook spacing. Made layout planning way faster.
Add a small shelf at the bottom. Some tools cannot hang. A small wooden shelf at the base of the pegboard catches items like spray paint cans, oil bottles, and small bins.
Bigger pegboard is better. I started with a 2x4 foot piece. Within a month I wished I had gone full 4x8. Most garages have wall space for the big sheet, and you fill it faster than expected.
Heavy power tools belong on a shelf, not pegboard. Drills, saws, and impact drivers are too heavy and bulky for pegboard. Build a small wood shelf below the pegboard for these. Pegboard is for accessories and hand tools.
What to Avoid
Common pegboard mistakes I have seen:
- Mounting too high (can’t reach top tools)
- Skipping the furring strips (hooks do not fit)
- Buying cheap thin hardboard (sags and breaks)
- Not painting first (gets dirty fast)
- Overcrowding the surface (defeats the visibility benefit)
- Hanging directly without studs (eventually fails)
Pegboard for Garden Tools
If you store garden tools in the garage, your pegboard layout looks different. You need:
- Larger hooks for shovels and rakes
- A horizontal rod for hanging garden gloves
- Bins for seeds and small accessories
- A shelf for fertilizer and bug spray
For more on seasonal storage, see our seasonal item storage guide.
Key Takeaway
A 4x8 pegboard wall costs under $100, takes one weekend to install, and transforms your garage from chaos to organized in a single weekend. The keys are: find your studs first, use furring strip spacers for the gap, paint before installing, and plan your layout before adding hooks. Start with the zone method to keep things organized long-term.
Once your pegboard is up, level up the rest of your garage with our garage storage systems comparison and budget garage organization guide.

Frequently Asked Questions
What size pegboard is best for a garage?
A 4 foot by 8 foot sheet of heavy-duty pegboard works best for most garages. This single sheet covers a full wall section, holds significant weight, and gives you flexible layout options. Multiple sheets can be installed side by side for larger walls.
How much weight can a pegboard hold?
Standard hardboard pegboard holds 5 to 15 pounds per hook. Heavy-duty metal pegboard holds 50+ pounds per hook. For garage tool storage, choose 1/4 inch thick hardboard or metal panels. Always mount to wall studs, not just drywall.
Do you need to seal a garage pegboard?
Yes if your garage is unheated or has humidity issues. Seal hardboard pegboard with two coats of polyurethane to prevent moisture damage. Metal pegboard does not need sealing. Painting pegboard before installation is the easiest way to seal it.