How to Create Functional Zones in Your Garage
When I first tackled our garage, I tried to organize everything in one weekend. Bad idea. I ended up with random bins everywhere and no actual system. Three months later, the garage was back to chaos.
The breakthrough came when I stopped thinking about “organizing the garage” and started thinking about “zones.” Each zone has a purpose and everything stored in that zone supports that purpose. Once the zones were defined, organizing each one took a few hours and the system stayed in place.
Here is exactly how I planned and built the zones in our 2-car garage, and how you can do the same in any size garage.
Why Zones Beat Random Organization
Random organization fails because there is no system for where things go. You put the rake “somewhere that makes sense right now” but next week you cannot find it. Zones create a memory map. Anyone in your household knows that all sports gear lives in the sports zone, and you put it there without thinking.
According to research from Princeton University, visual clutter and unclear systems increase cognitive load. Zones reduce that load because the system thinks for you.
What Is the Best Way to Organize a Garage?
The best way to organize a garage is to divide it into zones based on activity, not category. Create separate zones for parking, workshop, sports, seasonal storage, and household overflow. Assign clear boundaries to each zone using floor tape or physical dividers. Everything in a zone supports that zone’s specific purpose.
The 5 Essential Garage Zones
Every garage, regardless of size, benefits from these 5 zones. Larger garages can add specialty zones for hobbies.
Zone 1: Vehicle Parking
The most important zone. According to the US Department of Energy, only 25% of Americans actually park their car in their garage. Most use it for storage instead. Reclaim your garage for parking first.
To plan parking zone:
- Measure your vehicle dimensions including mirror width
- Add 18 inches on each side for door clearance
- Add 36 inches in front and behind for walking room
- Mark the parking footprint with floor tape
Anything inside the parking footprint must be removable or stored above eye level.
Zone 2: Workshop and Tools
Where you fix, build, repair, and tinker. This zone needs:
- Wall space for pegboard (see our garage pegboard guide)
- A workbench or surface for projects
- Power outlets within reach
- Good lighting (LED shop lights work great)
- Tool storage (drawers, pegboard, or rolling tool chest)
I put my workshop zone on the wall closest to the door from the house. Quick access for daily tool grabs.
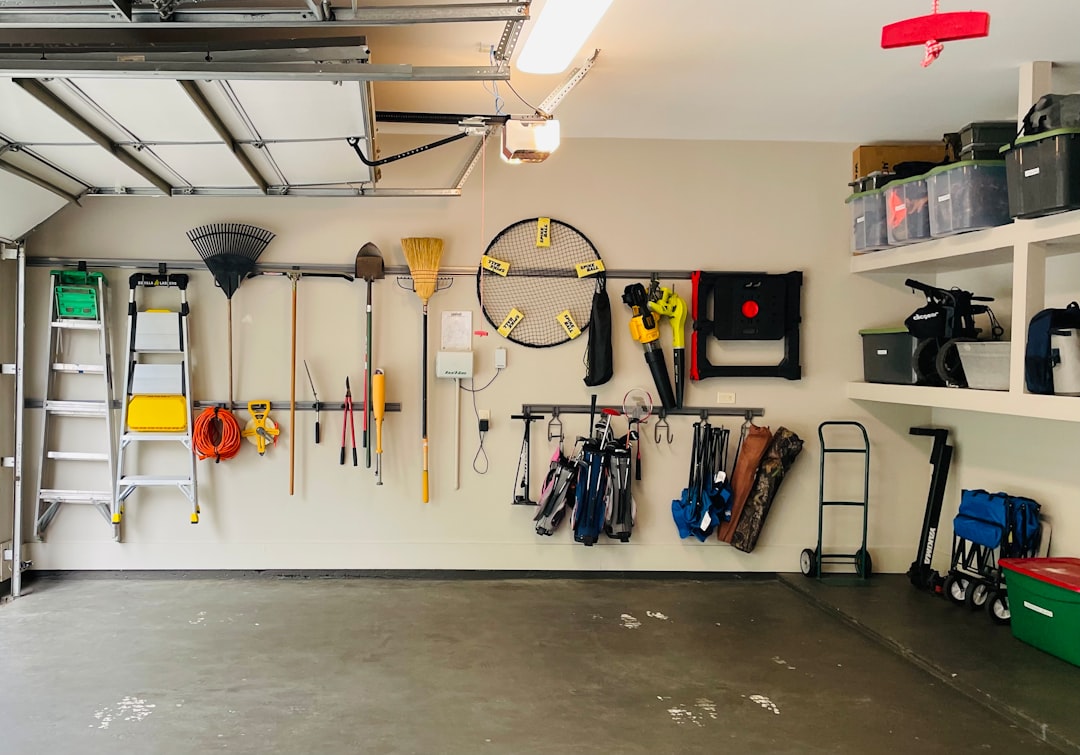
Zone 3: Sports and Outdoor Gear
Bikes, balls, helmets, sleds, scooters, beach gear, camping equipment. This zone moves with the seasons.
Storage options:
- Bike hooks mounted in the ceiling or wall
- Vertical sports rack (holds skis, snowboards, golf bags)
- Mesh bag system for balls
- Hooks for helmets, gloves, jump ropes
- Wall-mounted brackets for fishing rods
Keep most-used items at kid height if your family is active. Off-season gear moves to the seasonal storage zone.
Zone 4: Seasonal Storage
Holiday decorations, off-season clothes (in plastic bins), winter sports in summer (and vice versa), seasonal furniture cushions.
This zone goes:
- On overhead racks suspended from ceiling
- On high shelves
- In labeled clear plastic bins
- On the wall furthest from the door
I rotate items in and out quarterly. Spring decorations come down as winter goes up. For more on this rotation system, see our seasonal item storage guide.
Zone 5: Household Overflow
Paper goods (bulk toilet paper, paper towels), pet supplies, recycling bins, broom and mop, household cleaning backup supplies.
Best location: near the door from the house for quick access. Use shelving or a tall storage cabinet.
How Do You Separate Garage Zones?
Separate garage zones using painter’s tape on the floor, color-coded labels on bins, dedicated wall sections, or physical barriers like shelving units. The cheapest method is painter’s tape outlines on the concrete floor showing where each zone begins and ends. Tape lasts 6 to 12 months indoors before needing replacement.
Step-by-Step Zone Planning
Step 1: Measure Your Garage
Sketch the floor plan. Mark windows, doors, outlets, water heater, washer/dryer if you have them, and any permanent features.
Step 2: Subtract Parking First
Mark where vehicles park. This is non-negotiable space.
Step 3: Identify Wall Space
Each remaining wall gets assigned to a zone. Consider:
- Wall closest to house door: daily-use zones (workshop, household)
- Far wall: seasonal storage
- Side walls: sports and outdoor gear
- Ceiling: long-term storage on overhead racks
Step 4: Place Zones Based on Frequency
Use frequency-based placement:
- Daily/weekly access: chest height, near house door
- Monthly access: lower shelves and floor level
- Quarterly access: high shelves and overhead racks
Step 5: Add Boundaries
Once zones are placed, add clear boundaries:
- Painter’s tape outlines on the floor
- Color-coded zone labels on shelves
- Hooks dedicated to specific zones
- Bins labeled with zone name
This is where the system becomes self-explanatory for everyone in your family.
What I Wish I Knew
Lessons from years of garage organization.
Designate parking before anything else. I made the mistake of organizing all my storage first, then realizing my car would not fit. Plan parking footprint before any other zone.
Vertical space is your secret weapon. Most garages are 9 to 10 feet tall with completely empty space above 6 feet. Add overhead racks (Consumer Reports rates these as the highest-impact garage upgrade) and you double your storage capacity without losing floor space.
Use clear bins for seasonal storage. Opaque bins make you forget what is inside. Clear bins let you see contents from across the room. Add labels for clarity.
Buy a stud finder. I cannot count how many anchors I have used over the years. Find studs first. Every wall-mounted storage system depends on hitting studs.
Plan for gear that grows with kids. Sports zones especially. Your kid’s bike will need replacing every 2 years. Build in flexibility so the system evolves.
Sample Zone Layouts
Small 1-car garage (240 sq ft): Front 60% for parking. Back wall for workshop with small bench. Side walls split: one for sports, one for seasonal. Overhead rack for long-term storage.
Standard 2-car garage (400-500 sq ft): Center for two cars. Right wall for workshop. Left wall for sports gear. Back wall for seasonal and household. Overhead racks above parking for long-term storage.
Large garage (600+ sq ft): Parking center. Designated workshop zone with workbench. Separate sports gym zone. Seasonal storage in built-in shelving. Hobby zone for gardening or crafts. Household overflow near door.
Maintaining the Zones
The system only works if you maintain it. Here are 3 habits that keep zones from collapsing:
Quarterly walk-through: Every 3 months, do a 15-minute walk-through. Move anything in the wrong zone. Toss anything broken or unused.
One-in, one-out: When new gear comes in, old gear leaves. Especially in the sports zone where stuff accumulates fast.
Family education: Show every family member where each zone is. Teach kids “the rake lives in the sports zone, on the second hook.” Specific labels work better than vague areas.
For deeper decluttering before zone setup, see our garage decluttering guide.
Key Takeaway
A working garage starts with zones, not bins. Designate parking first, then assign every other zone based on activity, not category. Use frequency-based placement (daily access near the house door, seasonal storage far away). Add clear boundaries with tape or labels. Once zones exist, organizing within each zone is easy. Plan your zones this weekend and you will be amazed at how the rest falls into place.
Ready to build out each zone? Start with our budget garage organization and garage storage systems comparison guides.

Frequently Asked Questions
What are the zones in a garage?
The five core garage zones are: vehicle parking, workshop/tools, sports and outdoor gear, seasonal storage (holiday decor, off-season items), and household overflow (paper goods, pet supplies, recycling). Larger garages can split these into more specific zones.
How do I plan a garage layout?
Start by measuring the garage and noting vehicle dimensions. Designate parking first, then assign remaining wall space to zones based on use frequency. Daily-use zones go near the door from the house. Seasonal storage goes on high shelves or far walls.
What should I not store in a garage?
Avoid storing in the garage: paint (extreme temperature damage), electronics, photographs, important documents, propane, food (attracts pests), wine, leather goods, and bedding. These items degrade in temperature-uncontrolled spaces. Use indoor storage instead.