Bike Storage Ideas for Garages, Apartments, and Outdoors

Three bikes for two adults and one kid lived on our garage floor for years. To get the car in, we shuffled the bikes around. To leave the garage, we shuffled again. To get out of the car, we navigated around bike frames.
The fix was simple. Get the bikes off the floor. Here are 10 bike storage ideas that work, from $20 wall hooks to whole-room dedicated solutions.
Why Bike Storage Matters
Disorganized bikes cause real problems:
- Floor space lost: 3 bikes flat take 30+ square feet
- Damage: Bikes leaning on each other dent and scratch
- Difficulty using: Hard-to-reach bikes go unridden
- Theft risk: Visible outside bikes get stolen
- Family conflict: Tripping over bikes is a daily irritant
According to bicycle industry data, the average household owns 2.4 bikes, but only 1.2 are ridden monthly. Better storage solves the “get off the floor” problem and often increases bike use.
What Is the Best Bike Storage Solution?
The best bike storage solution gets bikes off the floor (wall mount, ceiling hoist, or vertical floor stand), protects the bike from damage (rubber-coated hooks, padded surfaces), and matches your usage pattern (visible for daily-use bikes, ceiling-stored for occasional use). Cost ranges from $20 to $200 per bike depending on solution.
10 Bike Storage Solutions
1. Wall Hooks (Best Budget Option)
Single hooks mounted to garage walls or apartment walls. Bike hangs by one wheel.
Cost: $15 to $30 per bike Best for: Most homes, all budget levels Installation: 30 minutes per hook with basic tools
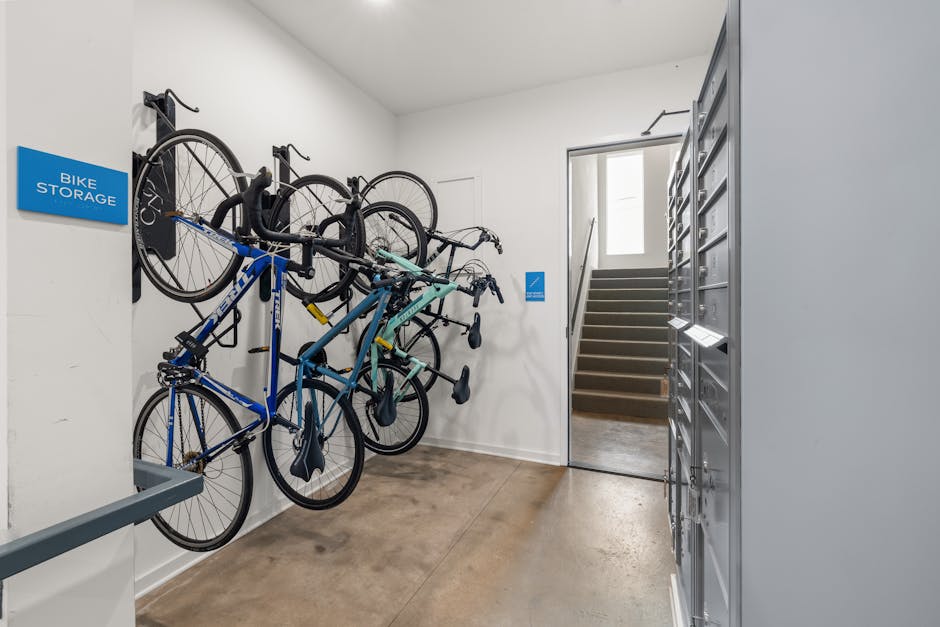
2. Vertical Bike Hangers
Wall hangers designed specifically for bikes. Bike mounts vertically, taking minimal wall space.
Cost: $25 to $50 per bike Best for: Small spaces, multiple bikes on one wall Installation: 30 to 45 minutes
3. Ceiling Bike Hoist (Pulley System)
A pulley system hauls bikes to the ceiling using rope. Bike stays out of sight when not in use.
Cost: $20 to $40 per hoist Best for: Garages with ceiling space, bikes used less than weekly Installation: 60 to 90 minutes (must hit ceiling joists)
4. Floor Stand (Single Bike)
A freestanding rack that holds one bike upright. No installation needed.
Cost: $20 to $50 Best for: Renters, no-tool households, single bike storage Installation: None (assembly only)
5. Multi-Bike Floor Stand
Holds 3 to 5 bikes in a row. Common in garages or basements.
Cost: $30 to $100 Best for: Families with multiple bikes Installation: Assembly only
6. Wall-Mounted Bike Shelf
A shelf that holds the bike at the top tube. Combines storage and decoration. Bike becomes part of the room.
Cost: $40 to $80 Best for: Stylish indoor storage, apartment living rooms Installation: 30 to 60 minutes (must hit studs)
7. Ceiling Hooks (Direct Mount)
Heavy-duty hooks mounted to ceiling joists. Bike hangs from front wheel.
Cost: $15 to $30 per bike Best for: Garages with low ceilings (under 9 feet) Installation: 30 to 60 minutes
8. Outdoor Bike Shed
A small shed designed for bikes. Lockable, weatherproof.
Cost: $300 to $800 Best for: Homes without garages, weatherproof outdoor storage Installation: Full afternoon or hire help
9. Bike Rack Inside the Garage Door
A track-style rack mounted inside the garage door. Bikes hang when door is closed.
Cost: $50 to $120 Best for: Garage doors with adequate clearance Installation: 60 to 90 minutes
10. Folding Bike Storage
For folding bikes specifically: collapses to under-bed, closet, or corner storage.
Cost: Free with folding bike Best for: Tiny apartments, urban riders Installation: None
What I Wish I Knew About Bike Storage
After organizing my own garage and helping two neighbors, here is what helped.
Daily-use bikes need easy access. The bike I ride 3 times a week is on a simple wall hook. Quick on, quick off.
Occasional bikes go higher. The fancy road bike that gets used twice a month is ceiling-hoisted. Out of the way but accessible.
Wall hooks need solid wall anchors. Drywall anchors fail for adult bike weight. Always hit a stud or use a 50+ pound rated anchor.
Measure handlebar width. Wide handlebars need wider wall spacing. Plan before mounting.
Tire protection matters. Hooks with rubber coating prevent rim damage. Worth the extra $3.
Garage Bike Storage Setup
Step 1: Audit Your Bikes (10 min)
- How many bikes?
- How often is each used?
- Daily-use, weekly-use, occasional, never-ridden?
Bikes never ridden in 12 months should be sold or donated. Storage works better for bikes you actually use.
Step 2: Plan the Layout (15 min)
- Daily-use bikes: Wall hooks at standing height for quick grab
- Weekly bikes: Wall hooks at higher position
- Occasional bikes: Ceiling hoist
- Kid bikes: Lower-height wall hooks they can manage
Sketch the layout before drilling.
Step 3: Install (1-3 hours)
- Find studs or ceiling joists
- Pre-drill holes
- Install hooks at correct heights
- Test weight capacity before relying on it
Step 4: Mount and Test (15 min)
- Hang each bike
- Confirm clearances for opening/closing doors
- Adjust if necessary
For more garage organization, see our garage zones guide.
Apartment Bike Storage Setup
Wall-Mount Options
Indoor wall hook: Most apartments allow with renter-safe hooks (3M Command rated for 25+ lbs or specific bike products)
Bike shelf: Doubles as decor; many designs work as wall art
Inside closet: Wall hook inside a closet preserves living space
Floor Options
Vertical floor stand: Bike stands upright, no wall damage Folding bike under bed: For collapsible bikes Bike in corner: Use floor stand with corner placement
Outdoor Options (If Available)
Balcony: Weatherproof cover, lock to railing Patio bike shed: For homes with outdoor space Bike locker: Some apartments offer bike storage rooms
For small space optimization, see our small home office guide (similar small-space principles apply).
How Do You Protect Bikes in Storage?
Protect bikes in storage using these strategies: rubber-coated hooks (prevent rim damage), bike covers for dusty environments, monthly chain maintenance (lube and wipe), and keeping bikes off concrete floors (moisture damage). For long-term storage, raise the tires off the ground and overinflate slightly to prevent flat spots from forming.
Special Situations
Multiple Bikes in Small Garage
Use a combination:
- 2 to 3 daily-use bikes on wall hooks
- Excess bikes on ceiling hoist or in attic
- Consider whether you actually need all bikes
Heavy Electric Bikes
Standard hooks are not rated for e-bike weight (60+ lbs). Use:
- Heavy-duty wall mounts rated for 75+ lbs
- Floor stands rather than wall hanging
- Avoid ceiling hoists for e-bikes
Cargo or Long-Tail Bikes
Standard hooks do not fit. Use:
- Custom-built wall hangers
- Floor parking with locked frame
- Outdoor shed sized for length
Folding Bikes
The dream of small spaces:
- Folded under bed
- Inside closet
- Behind door
- In trunk of car
Kid Bikes
Often outgrown quickly. Strategy:
- Buy second-hand when possible
- Sell or donate when outgrown
- Store currently-used at kid-accessible height
- Outgrown bikes go to storage or sale immediately
Bike Maintenance During Storage
Bikes need basic care while stored:
Weekly check: Tire pressure, chain condition, no rust spots Monthly maintenance: Lube chain, wipe frame, check brakes Seasonal storage: For long-term, raise tires, store inside if possible Pre-ride check: Brakes, tire pressure, chain working
For more on tool organization (similar to bike maintenance), see our tool organization guide.
Common Bike Storage Mistakes
After helping family and friends:
Mistake 1: Storing on floor. Damages tires, takes space.
Mistake 2: Drywall anchors only. Bike falls, wall damaged.
Mistake 3: Not measuring clearances. Bike does not fit where planned.
Mistake 4: Storing in damp areas. Rust on bike, chain, components.
Mistake 5: Keeping bikes never ridden. Sell or donate them.
Decluttering Bikes
Before storing, evaluate:
Keep: Bikes ridden in past year Donate or sell: Bikes unridden 2+ years Repair: Bikes you would ride if fixed (within $100 budget) Recycle: Bikes beyond repair (city programs accept metal)
Local bike co-ops accept donations. Police auctions and Craigslist work for selling.
Bike Locks for Stored Bikes
Even in garages, lock bikes:
Garage door open often: Lock to a fixed point Apartment storage room: Heavy U-lock + cable Outdoor storage: Two locks (U-lock + cable) and quality Travel storage: Portable locks rated for the bike’s value
For more security in the garage, consider mounting bikes high enough that quick theft requires a ladder.
Key Takeaway
Bike storage solves both space and longevity problems. Get bikes off the floor using wall hooks ($20 to $40 per bike), ceiling hoists for occasional-use bikes ($20 to $40), or floor stands for renters and no-tool households ($30 to $100). Daily-use bikes deserve easy-access spots; occasional bikes can go higher or further back. Apartment dwellers can use wall mounts or vertical stands; renters should use removable solutions. Outdoor storage is acceptable for cheaper bikes with weather covers and locks. The setup takes 1 to 3 hours and transforms how often you actually ride. Most garages can fit 3 to 5 bikes vertically in space that was unusable when bikes were on the floor.
For more garage organization, see our garage zones guide and garage pegboard guide.

Frequently Asked Questions
What is the best way to store bikes in a garage?
The best garage bike storage uses wall hooks or ceiling hoists to lift bikes off the floor. Wall hooks save floor space and cost $20 to $40 per bike. Ceiling hoists pull bikes up to the ceiling using a pulley system and are perfect for bikes used less than weekly. Both prevent the bike pile-up that makes garages unusable.
How do you store a bike in a small apartment?
Store a bike in a small apartment using vertical wall mounts (bike hangs by front wheel), space-saving floor stands, or under-bed storage for folding bikes. Wall mounts cost $25 to $50 and free up all floor space. Some renters use removable mounting solutions to avoid wall damage.
Can you store a bike outside?
Yes, store bikes outside using a covered bike shed, weatherproof bike cover, or under a porch overhang. Apply weather-resistant lubricant to chains monthly. Lock the bike with a quality U-lock plus cable. Cheap bikes can survive outdoor storage; expensive bikes should always go indoors when possible.