Open Shelving Organization: Beautiful and Functional

We removed our upper kitchen cabinets and installed open shelves 3 years ago. The transformation was incredible. The kitchen felt larger, brighter, more personal. Within 2 months, the shelves were a cluttered mess.
The fix was learning open shelf organization principles. Now our shelves stay beautiful and functional. Here are the 10 strategies that finally worked.
Why Open Shelving Is Tricky
Open shelves look beautiful in magazines because they are:
- Curated with matching items
- Limited to specific items
- Regularly dusted
- Styled with intention
Real-life open shelves often:
- Mix random dishes
- Hold practical (ugly) items
- Accumulate dust
- Lose intentional styling
The result: beautiful concept, frustrating reality.
According to research from Magnolia Network, 60% of homeowners who install open shelves report mixed feelings within the first year. The fix is intentional organization.
What Is the Best Way to Style Open Kitchen Shelves?
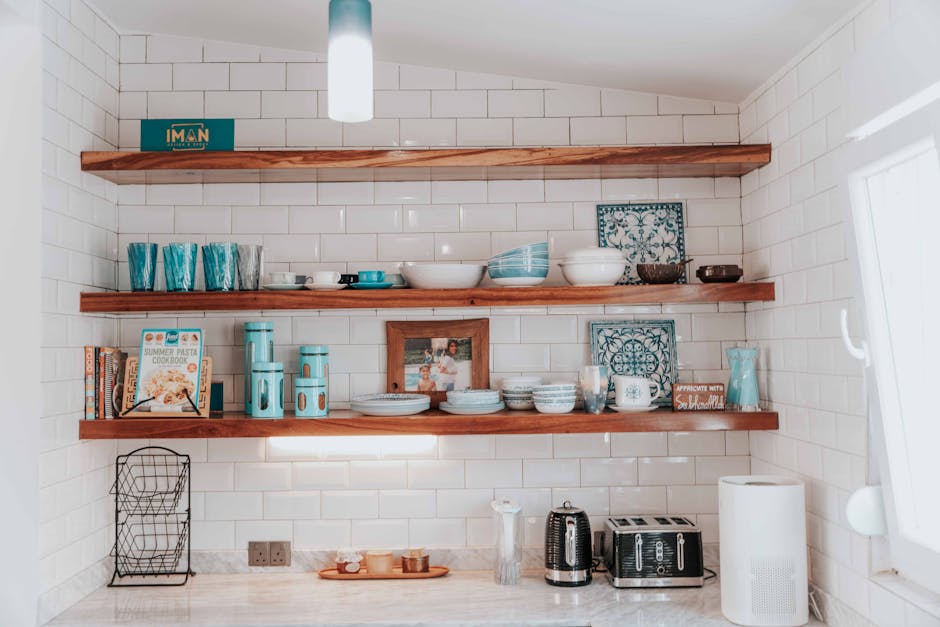
The best way to style open kitchen shelves combines functional items (matching dishes you use daily) with decorative elements (plants, art, special pieces), creates varied heights and groupings, maintains 30% empty space for breathing room, and prioritizes coherent aesthetic over maximum storage. Less is more on open shelves.
10 Open Shelving Strategies
1. Limit Items Drastically
Open shelves should display only:
- Daily-use dishes (matching set)
- Beautiful glassware
- Plants
- Selected art pieces
- 2-3 functional items per shelf
Avoid: Random mixed items, ugly practical items, every kitchen tool
2. Match Your Dishes
Mismatched dishes look chaotic on open shelves.
Solution: One main dish set on display. Specialty dishes hidden.
3. Group by Function
Each shelf has a theme:
- Top shelf: Special occasion or display
- Middle shelf: Daily dishes
- Bottom shelf: Glasses
Themes create visual coherence.
4. Add Heights and Layers
Visual interest comes from variety:
- Tall items (vases, tall glasses)
- Stacks (plates, bowls)
- Single items (special bowl)
- Plants for life
5. Include Negative Space
70% full, 30% empty. The negative space:
- Reduces visual clutter
- Highlights items kept
- Creates intentional look
6. Add Living Elements
Plants and herbs add:
- Color
- Texture
- Freshness
- Connection to nature
7. Color Coordination
Pick 2 to 3 colors as theme:
- White and neutral
- Black and white
- Wood tones
- Specific accent color
Coordination prevents visual chaos.
8. Mix Materials
Variety adds interest:
- Ceramic dishes
- Glass items
- Wood elements
- Metal accents
- Plant pots
9. Functional Storage Below
Hide practical items below open shelves:
- Cookware in lower cabinets
- Bulk storage in pantry
- Less attractive items hidden
10. Regular Maintenance
Open shelves need:
- Weekly dusting
- Monthly reset
- Quarterly major cleaning
- Annual styling refresh
What I Wish I Knew About Open Shelves
After 3 years of trial and error:
Less is more. I initially loaded shelves. Bad look. Now shelves have breathing room.
Matching dishes are necessary. Mismatched look bad. Bought matching set; problem solved.
Plants change everything. Two plants on shelves added warmth and life.
Dust is real. Weekly dusting needed. Worth it for the look.
Functional items hidden below. Open shelves for display. Practical items in cabinets.
How Do You Keep Open Shelves Looking Clean?
Keep open shelves looking clean with weekly dusting using microfiber cloth, monthly removal of items for deeper cleaning, attention to dust patterns (vertical surfaces collect more), and using items regularly to prevent stagnant dust. Items rarely used become dustier; the dust shows the neglect.
Specific Item Categories
Best for Open Shelves
- Matching dishes (clean, beautiful)
- Coffee mugs (if matching)
- Glassware (transparent)
- Cookbooks (favorites only)
- Plants in matching pots
- Cutting boards (decorative)
- Vases
- Decorative bowls
- Pour-over coffee equipment
- Beautiful kitchen tools
Best Hidden in Cabinets
- Pots and pans
- Tupperware
- Random utensils
- Mixed dishes
- Bulk supplies
- Specialty appliances
- Older items
- Items that look industrial
- Random storage
Setting Up Open Shelves
Step 1: Empty Current Shelves
Pull everything off. Sort.
Step 2: Audit Items
For each item:
- Beautiful? Display
- Practical? Hide
- Used daily? Display if pretty, hide if not
- Special occasion? Display top shelf or hide
Step 3: Plan Layout
Sketch:
- What goes on each shelf
- Heights and groupings
- Decorative additions
- Plants placement
Step 4: Style Intentionally
Place items:
- Heights vary
- Color coordinated
- Groupings by theme
- Negative space included
Step 5: Step Back and Adjust
After placing:
- View from different angles
- Adjust placement
- Add or remove until balanced
- Take photo for reference
Common Open Shelving Mistakes
After 3 years of refining:
Mistake 1: Too much. Visual clutter.
Mistake 2: Mismatched dishes. Chaotic look.
Mistake 3: All practical items. Boring, often ugly.
Mistake 4: No plants. Sterile.
Mistake 5: Skipping dust. Looks dingy over time.
For more kitchen organization, see our kitchen cabinet organization and coffee station organization guides.
Coordinating With Closed Cabinets
Most kitchens have both:
Open shelves: Display, curated, intentional
Closed cabinets: Functional, hidden storage, practical
The combination provides storage without overwhelming visual chaos.
Specific Kitchen Sizes
Small Kitchen
Open shelves can:
- Save visual space
- Make kitchen feel larger
- Display essentials
Be cautious:
- Limited storage
- Need matching items
- More visible mess
Medium Kitchen
Standard approach:
- 2 to 3 open shelves
- Rest closed cabinets
- Balance of display and storage
Large Kitchen
Premium option:
- Multiple open shelf sections
- Designer display
- Curated collections
- Plenty of closed storage
Seasonal Variations
Update open shelves with seasons:
Spring: Lighter colors, fresh greenery Summer: Bright color accents, beach items Fall: Warm tones, pumpkins, harvest Winter: Cool tones, evergreen, candles
The variation keeps shelves feeling fresh.
Family Considerations
For households:
Kid-friendly displays: Kid art, framed projects Functional items: For multiple users Coordinated style: Family preference Safety: Glass items at higher shelves if kids
Maintenance Routine
Keep open shelves beautiful:
Daily: Quick visual check Weekly: Dust all surfaces Monthly: Remove items, clean shelves deeply Quarterly: Major styling refresh Annually: Major reassessment
For more cleaning, see our monthly cleaning checklist.
Photography Considerations
For Instagram-ready shelves:
Natural light: Photograph during day Variety in height: Visual interest Plant focus: Greenery anchors Quality items: Quality looks good Empty space: Allows eye rest
Investment
Cost considerations:
Basic setup: $0 to $100 (use what you have) Mid-range: $100 to $300 (some new dishes, plants) Premium: $300 to $1,000+ (full matching sets, statement items)
The investment is the items, not the shelves themselves.
Adding to Existing Shelves
If shelves exist but cluttered:
Step 1: Remove everything Step 2: Apply principles (less, matching, themed) Step 3: Re-style intentionally Step 4: Maintain with weekly attention
Transformation takes 30 to 60 minutes.
Removing Open Shelves
If they don’t work:
Install closed cabinets: Standard alternative Cover with curtains: Soften the look Add doors: Convert to closed Move items: Reduce visible inventory
Not every kitchen suits open shelves.
Key Takeaway
Open shelf organization works with intentional curation rather than maximum storage. Display only matching, beautiful items. Group by theme on each shelf. Maintain 30% negative space. Add plants for life. Hide practical items in closed cabinets. Style with varied heights and materials. Dust weekly. Monthly reset. Quarterly refresh. The transformation creates a kitchen that feels designer-curated rather than cluttered. Total time investment: 1 to 2 hours initial setup, 10 minutes weekly maintenance. The compound benefit: a kitchen you love walking into instead of one you tolerate.
For more kitchen organization, see our kitchen cabinet organization, small kitchen ideas, and pantry organization guides.

Frequently Asked Questions
Are open shelves good for kitchens?
Open shelves work well for kitchens when you have matching dishes, like display, and willing to dust regularly. They show off intentional collections, make items accessible, and add visual interest. Avoid open shelves if you have mismatched dishes, hate dusting, or need maximum storage.
How do you style open kitchen shelves?
Style open kitchen shelves with matching or coordinating items, varied heights for visual interest, 70% functional / 30% decorative balance, color coordination, and intentional negative space. Limit to 2 to 4 shelves; more becomes cluttered. Each shelf should have a theme or purpose.
How often should you dust open shelves?
Dust open shelves weekly to maintain appearance. Items shelved in kitchens accumulate grease, dust, and cooking residue. Weekly dusting prevents the buildup that makes shelves look dingy. Items used regularly need less maintenance; decorative items need more.