Walk-In Closet Organization Ideas and Layout Tips
When we moved into our current house, the walk-in closet was a builder-grade empty room with one wire shelf and a single rod. Within 6 months of moving in, it had devolved into chaos. Clothes everywhere, shoes piled on the floor, accessories scattered.
After a weekend redesign and about $400 in materials, our walk-in closet now feels like a boutique. Everything has a place, the system is intuitive, and getting dressed in the morning takes half the time. Here is how to plan and organize a walk-in closet that actually works.
Why Walk-In Closets Often Become Chaotic
A walk-in closet has more space than a regular closet, which sounds like an advantage. But more space without a system equals more places for chaos to hide. The big space encourages dumping items “for now” because there is always room.
According to a study referenced by ClosetMaid, the average walk-in closet uses only 50% of its potential storage capacity because of poor vertical planning. The opportunity is huge if you design intentionally.
What Is the Ideal Walk-In Closet Layout?
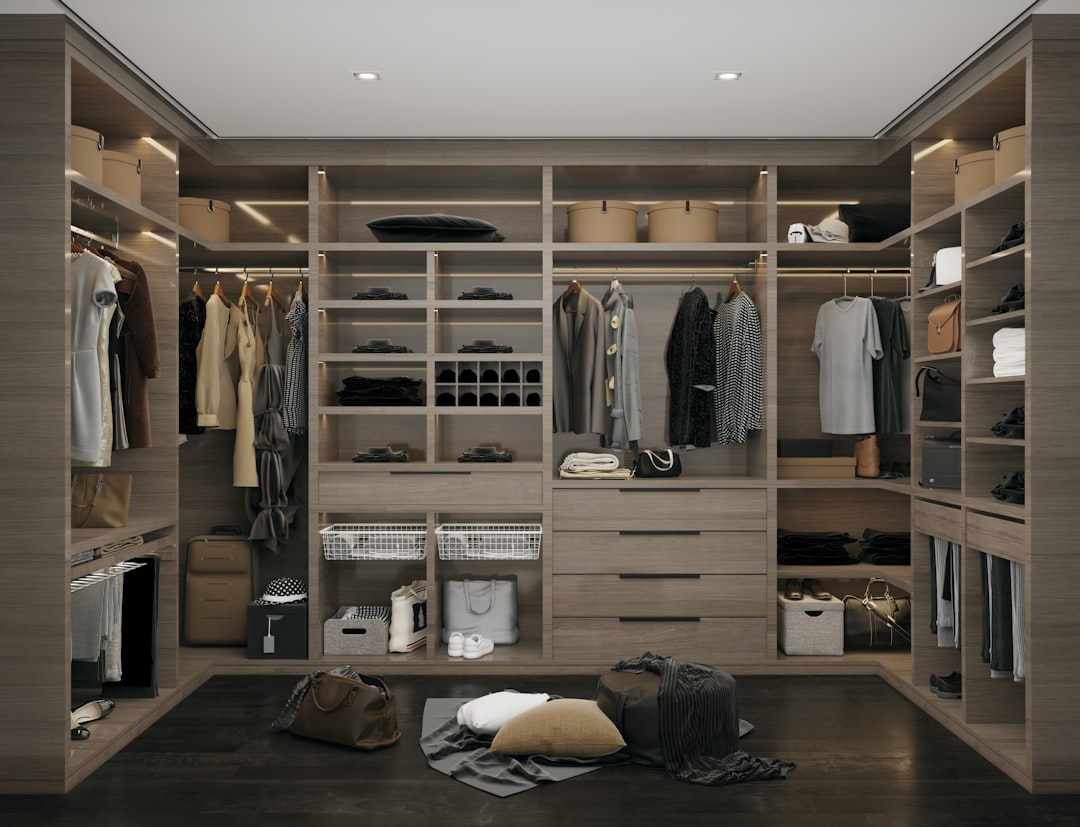
The ideal walk-in closet layout uses all three walls efficiently. Use one long wall for double-hang rods (shirts above, pants below). Use the opposite wall for single-hang rods (dresses, coats) above and drawers below. Use the back wall for shoes and accessories. Keep a 36-inch walking path through the center.
12 Walk-In Closet Organization Ideas
1. Plan Double Hanging on the Long Wall
Most clothes (shirts, blouses, jackets, folded pants on hangers) fit under 40 inches in length. A double-rod system puts two rods stacked vertically: one at 80 inches and one at 40 inches.
This doubles your hanging capacity on one wall. A 6-foot wall section holds 12 feet of hangable clothing.
2. Single Hanging for Long Items
Dresses, long coats, robes, and full-length items need single hanging. Designate one section (usually corner-to-mid-wall) for these.
Single hang rod typically at 65 to 68 inches high.
3. Drawers Below the Hanging Section
Add a drawer unit under one of the hanging sections. Folded items (jeans, sweaters, t-shirts, underwear, pajamas) live in drawers.
Pre-built drawer units cost $150 to $400. DIY drawer dressers from IKEA or similar cost less.
4. Shoe Storage on the Back Wall
The back wall (across from the entrance) is prime shoe real estate. Options:
- Tilted shoe shelves (shows the shoe profile)
- Flat shelves with shoes in pairs
- Stacking shoe racks
- Built-in cubbies (premium option)
I prefer tilted shelves because the visual presentation makes shoe choice faster.
For more shoe storage options, see our shoe organization guide.
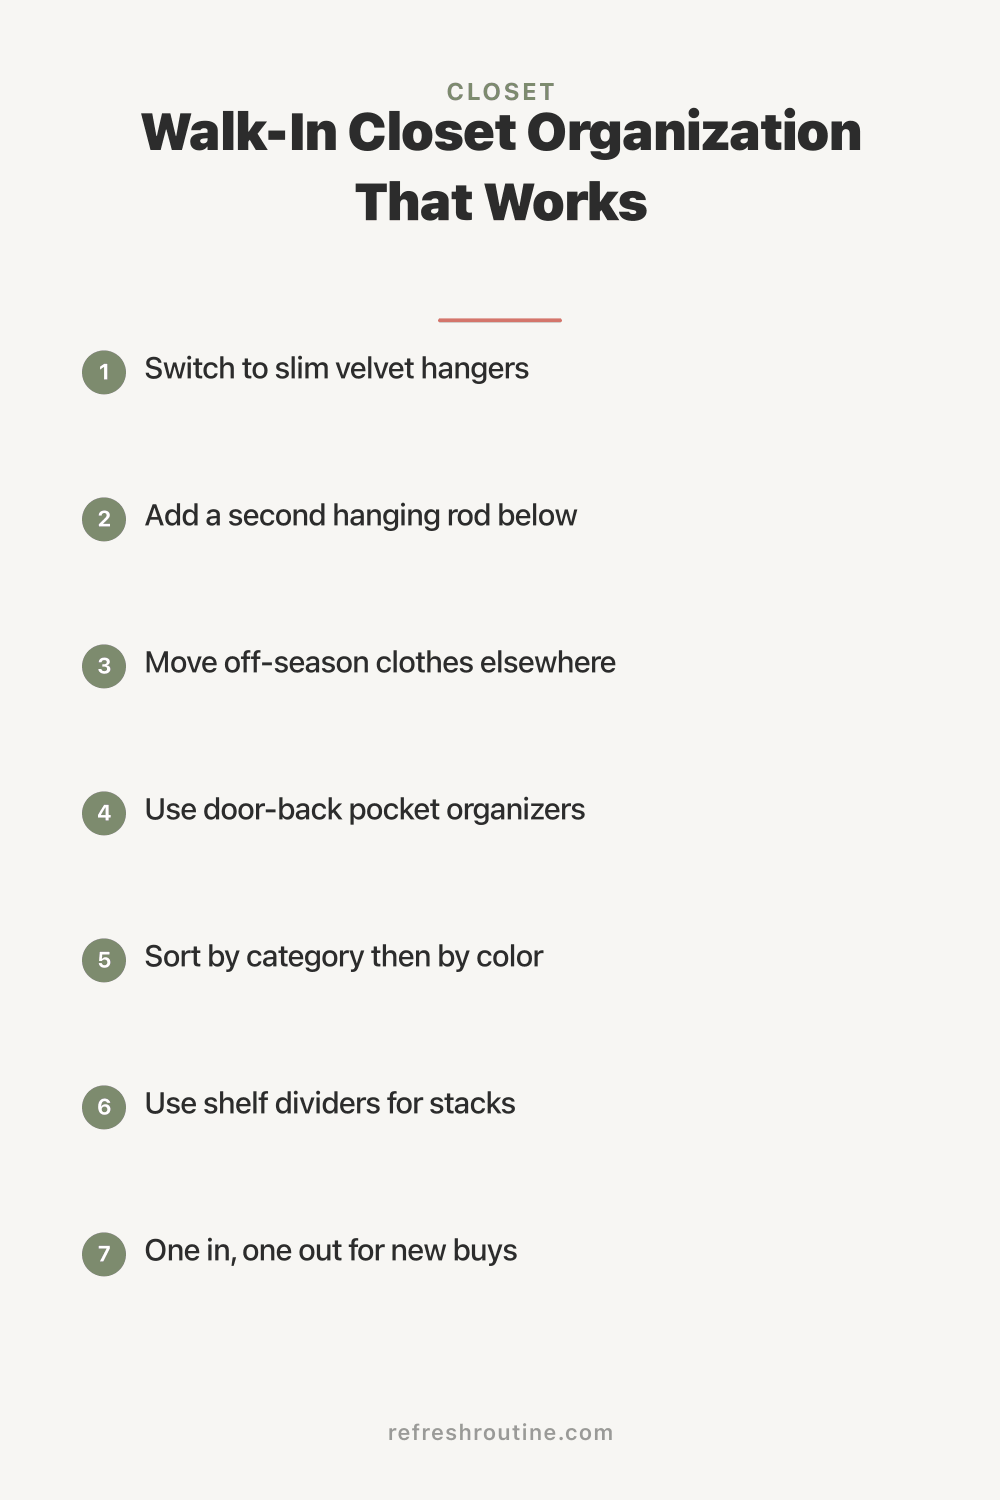
5. Top Shelves for Off-Season
The shelf above hanging rods (8 feet+) holds off-season items in clear bins or baskets. Label everything because you cannot easily see the top shelf contents.
Sweaters in summer go to top shelf bins. Lightweight tops in winter go to top shelf bins. Rotate seasonally. For the full rotation system, see our seasonal clothing rotation guide.
6. Center Island for Larger Closets
If your walk-in is large enough, a center island provides:
- Folding surface on top
- Drawers in the middle
- Bottom shelves for shoes or bags
- Hooks on the sides
Skip this if your closet is smaller than 10x10 feet. The center walking space is more valuable than an island.
7. Acrylic Accessory Drawers
Clear acrylic dividers inside drawers organize jewelry, scarves, belts, and watches. Cost: $30 for a complete set. Visibility = use.
8. Hooks on the Side Walls
Free walls (between hanging sections or behind the door) get hooks for:
- Tomorrow’s outfit (plan ahead)
- Bags you carry daily
- Belts
- Robes
- Yoga clothes set aside for tomorrow’s class
9. Full-Length Mirror
A full-length mirror in the closet means you check outfits in the same place you choose them. Either freestanding ($75) or wall-mounted ($40).
Inside the door is the best location if you have one.
10. Good Lighting
Builder-grade closet lighting is usually one harsh fluorescent. Upgrade to:
- LED strip lights mounted under shelves
- Battery-operated tap lights inside drawers
- A warm-temperature LED bulb in the main fixture
- Motion-activated lights for hands-free use
The Department of Energy reports that LED lighting uses 75% less energy than incandescent and lasts 25 times longer. Good investment.
11. Matching Hangers
Mixed hangers look chaotic and waste rod space. Replace all hangers with matching slim velvet hangers ($25 for 50).
Benefits:
- Save 50% of rod space (slim profile)
- Visual consistency
- Non-slip velvet prevents clothes from falling
12. Color-Coded Sections
Within each clothing type, arrange by color. Whites/light colors on the left, dark colors on the right, with rainbow flow in between.
Outfit-building is faster when you can see all your blues at once.
How Much Does a Walk-In Closet Renovation Cost?
A walk-in closet renovation ranges from $500 (DIY with basic materials) to $5,000+ (custom built-ins from a closet company). The middle ground at $1,500 to $2,500 gets you quality drawer units, custom shelving, double-hang rods, shoe storage, and lighting. Budget DIY versions deliver 70% of the result for 20% of the cost.
What I Wish I Knew
After organizing 3 walk-in closets over the years.
Plan before you buy anything. I bought storage units before measuring carefully. Returned $200 of stuff. Now I measure and plan with graph paper before any purchase.
Vertical space is undervalued. I focused on horizontal layout first. Adding the top shelf with bins doubled my off-season storage. Now I plan vertical first.
Lighting is everything. The same closet feels completely different with warm LED lighting versus harsh white fluorescent. Spend $50 on LED upgrades. Worth every penny.
One walking path is enough. I tried to plan a U-shape with paths on both sides. Wasted space. A single clear walking path through the center is plenty.
Buy quality hangers once. I went through 4 sets of cheap hangers before splurging on quality velvet ones. Wishfix from day one. $25 to $40 is the going rate for 50 hangers.
Walk-In Closet Layouts by Shape
Long rectangular closet (e.g., 5 feet wide x 10 feet long):
- Hanging on both long walls
- Drawers under one of the hanging sections
- Shoe shelves on the back wall
- Top shelves above hanging
Square closet (e.g., 8 feet x 8 feet):
- L-shape or U-shape configuration
- Center area kept clear for movement
- Use corners with custom corner shelving
Small walk-in (under 50 sq ft):
- Single side for hanging
- Other side for drawers and shoes
- Skip the center island
- Maximize wall height
Large walk-in (over 100 sq ft):
- Central island worth the space
- Multiple hanging zones
- Dedicated accessory station
- Seating bench for putting on shoes
How Do You Maximize a Small Walk-In Closet?
Maximize a small walk-in closet by adding a second hanging rod for double-hang capability, using clear stackable bins on top shelves, installing over-door organizers for accessories, using slim velvet hangers throughout, removing off-season clothes to other storage, and choosing wall-mounted drawers instead of floor units to keep floor space open.
The Right Order to Organize
If you are starting from scratch, follow this order:
Day 1: Empty the closet completely. Yes, every item out. Sort into keep, donate, trash.
Day 2 (after donations are gone): Paint and install lighting. With the closet empty, this is the easiest time to do these tasks.
Day 3: Install hanging rods, drawer units, and shelves. Measure twice, install once.
Day 4: Add hangers, bins, and accessories. Color-code clothes as you put them back.
Day 5: Maintenance pass. Adjust what is not working. The first week of use reveals what needs tweaking.
For more on the initial purge step, see our decluttering starter guide.
Maintaining the Walk-In
Walk-in closets are easy to maintain if you stick to these habits:
- One-in, one-out: For every new purchase, donate one item
- Sunday reset: 10-minute walk-through every Sunday to rehang misplaced items
- Quarterly rotation: Swap seasonal items to/from top shelves
- Hang clothes after wearing or put in laundry: never leave on the floor
Key Takeaway
A walk-in closet works when every wall has a purpose, hanging is doubled where possible, drawers handle folded items, and shoes get their own visible storage. Plan with graph paper before buying anything. Invest in lighting, matching hangers, and one acrylic accessory drawer system. The transformation costs less than people think and delivers daily benefits that last for years. Start with the empty-everything weekend purge. The rest builds from there.
For complete closet systems, see our capsule wardrobe guide and linen closet organization.

Frequently Asked Questions
How do I organize a walk-in closet?
Divide your walk-in closet into zones by garment type. Plan double-hang rods for shirts and pants, single-hang rods for dresses and coats, drawers for folded items, shoe shelves at the bottom, and accessory storage at the top. Use vertical space fully and keep walking paths clear.
What is the best layout for a walk-in closet?
The best walk-in closet layout depends on shape. For rectangular closets, use a U-shape with hanging on the long walls and an island or drawer unit in the middle. For square closets, use L-shape or galley layouts. Always plan for a clear 36-inch walking path through the center.
How can I make my walk-in closet look more luxurious?
Add good lighting (LED strips on rods and inside drawers), use matching hangers throughout, organize by color within each section, add a full-length mirror, install crown molding if possible, and use baskets or boxes on top shelves for hidden storage. These touches transform any closet into a boutique experience.